30 July 2011

Fabric key ring

Once I was ready with the PC bag I thought it would be a good idea to have a coordinated accessory. So I made another fabric key ring. I used a piece of the thick cotton twill, the same that I used for the handles of the bag, and stitched a string of fabric on top, in both sides. This string also holds the D-ring.
Simple and nice design!


Nada más terminar el bolso para portátil pensé que sería una buena idea tener un accesorio a juego. Así que hice otro de mis llaveros de tela. En éste he usado un trozo de la cinta de algodón que utilicé para las asas del bolso, y una tira de la tela estampada cosida por encima, rodeando la cinta. Esta tira sirve para sujetar la anilla del llavero.
Un diseño simple y bonito!


26 July 2011

My first PC bag!!

This is my first PC bag and I am very proud about the result. So I could not wait longer to publish some photos.


A couple of months ago I got a custom order requesting a PC bag. After some brainstorming and some drawings of two different designs this was the one selected. I'd never made one before so it was completely out of my comfort zone. And I enjoyed a lot the whole process. Thanks my dear friend for your order!! and your patience... :)

Now let's talk a bit more about the bag...

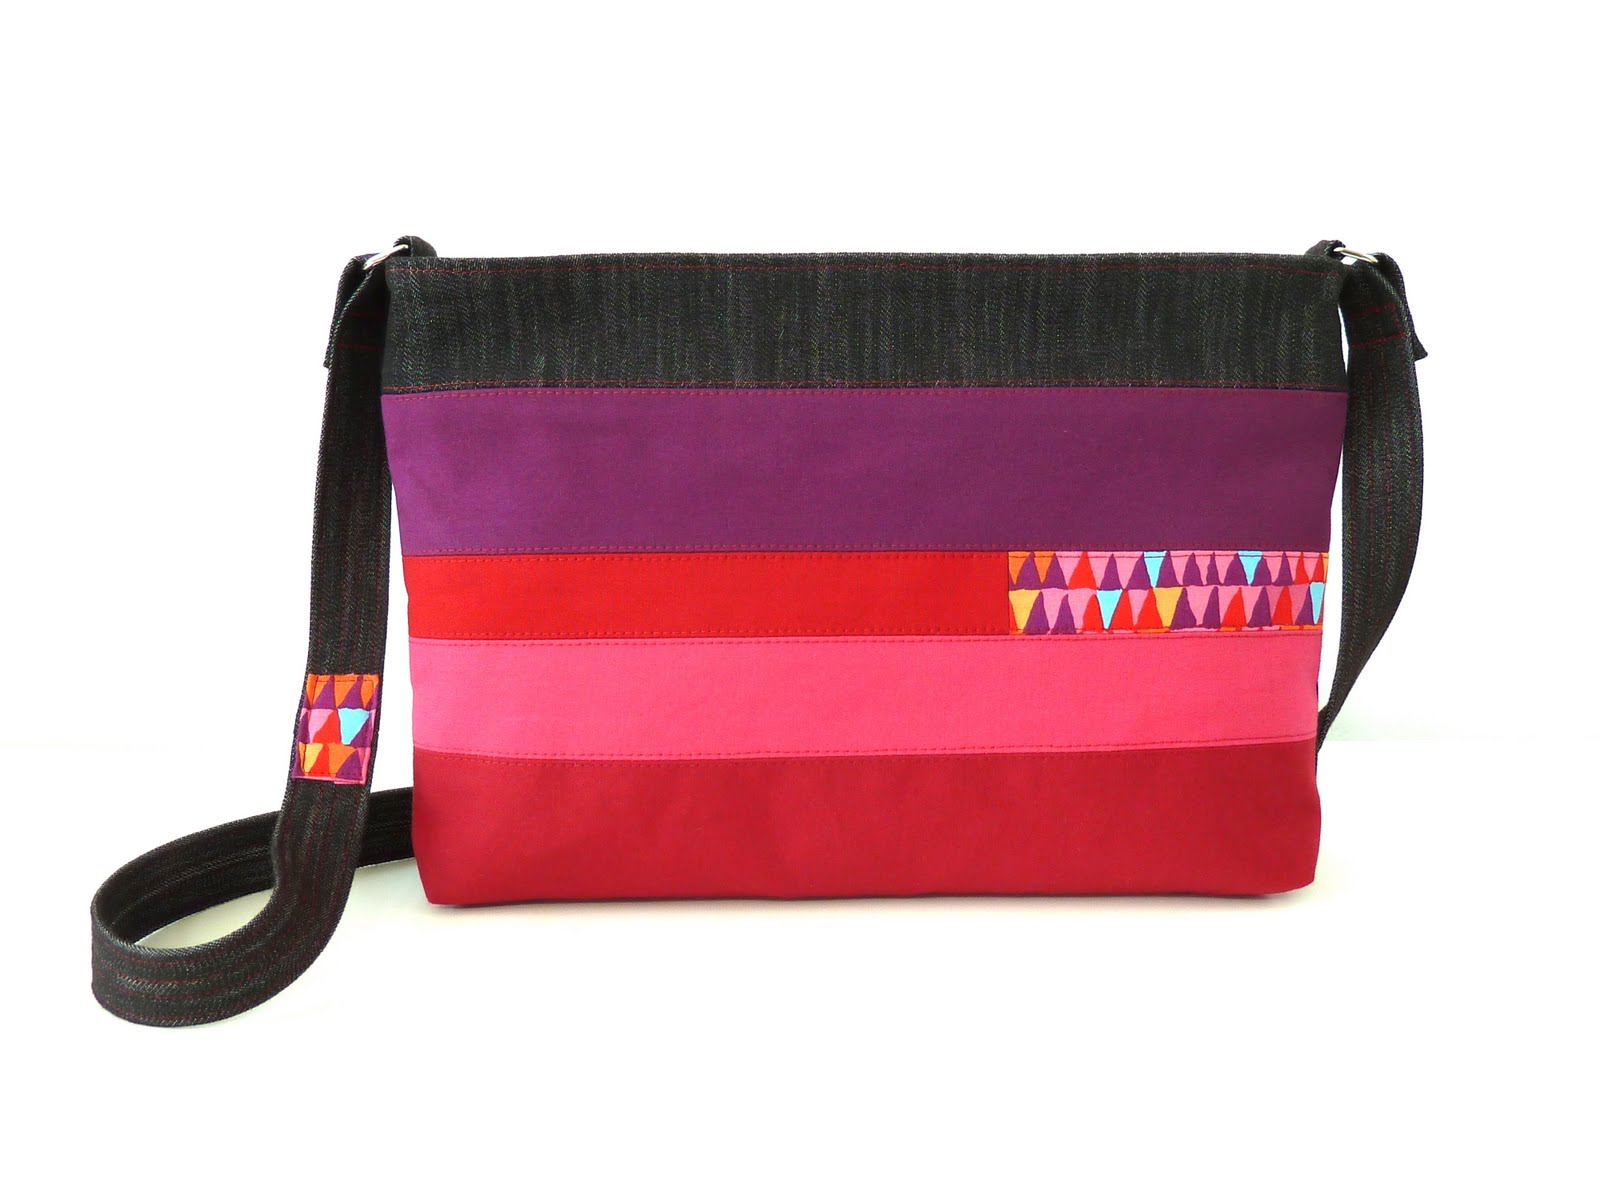
It is made from a very nice brushed cotton canvas in deep red color. In the front pocket I combined the canvas with a coordinated print to add a personal touch. This pocket closes with a fastener snap so that your stuff will be safe inside.
Since the print has a little bit of green I selected a white polka dots print on a pale green background for the lining.


The bag has two interior pockets, pencil holders as well as a D-ring, which can be used to hold the keys, for example.

Since it is intended to carry a computer it had to be sturdy enough to protect it so I included a layer of wadding. This adds a little bit of padding, which helps to keep the shape of the bag and, at the same time, will protect the PC perfectly.

I wanted to try the bag before delivering it to its owner, making sure that the size was correct, but I do not have such a big laptop. After searching around the house I found the object with the perfect matching size... a lid from plastic Ikea boxes, the ones we use to keep the kids' toys organized.
I've already told that I love Ikea, it comes in handy many times ;-)
Well, the results of my test was possitive. The computer (in this case, the fake computer, ha, ha) fits inside the bag and seems to be very well protected.

It is quite a big bag as it is intended for a 17" MAC, but it can be customized to any other size. I find it very nice to be used without the computer if you like, as a normal bag.
This bag will be available soon, made to order, in my shop.


Este es el primer bolso para PC que hago y estoy tan orgullosa del resultado que no podía esperar más para publicar unas fotos. 


Hace un par de meses recibí un pedido a medida de un bolso para portátil. Después de intercambiar ideas y sugerencias, diseñé dos modelos diferentes, y éste ha sido el elegido. Al ser mi primer bolso de este tipo ha supuesto un reto importante. Definitivamente he disfrutado del proceso completo, desde el diseño hasta la confección, muy interesante. Así que gracias mi querida amiga por el pedido!! y gracias también por tu paciencia... :)

Ahora vamos a hablar un poquito más del bolso...

Para el cuerpo elegí una loneta de algodón cepillado, en un color burdeos que me encanta. Para darle un toque especial y romper un poco la monotonía del bolso le he añadido una franja estampada en el bolsillo frontal, a modo de patchwork. Esto bolsillo cierra con un corchete para poder llevar tus cosas bien seguras.

Como el estampado tiene unas finas líneas en verde he seleccionado una tela de lunares blancos sobre un fondo verde muy pálido para el forro. Los complementos, como los sujeta-lápices y una anilla que he añadido en un lateral, son en rojo, igual que las costuras, para poner un poco de contraste y animar el interior.


Como el bolso es para un PC tenía que ser lo suficientemente fuerte para protegerlo de posibles golpes, así que le he añadido una capa de guata, que añade algo de acolchado para proteger el ordenador perfectamente y también mantener la forma del bolso.

Quería probar el bolso antes de enviarlo a su destinatario, más que nada para asegurarme de que las medidas eran las correctas, pero no tengo un portátil de este tamaño, un señor PC de 17". Después de dar unas vueltas por casa he conseguido encontrar el objeto con las medidas exactas... la tapa de unas cajas de plástico de Ikea, las que usamos para guardar los juguetes de los niños.
Ya he dicho otras veces que me encanta Ikea, es muy útil en muchas ocasiones... ;-)
El resultado de la prueba ha sido satisfactorio. El portátil (en este caso, falso portátil, ja, ja) cabe perfectamente y queda muy seguro dentro del bolso.

Es un bolso bastante grande, pensado para un MAC de 17", pero se puede adaptar a cualquier otra medida. Incluso me parece un bolso chulísimo para usar sin ordenador, así, de bolso normal y corriente, para quien quiera una bolso grandote.

Este bolso estará disponible muy pronto, bajo pedido, en mi tienda.

Pink Tuesday


22 July 2011

My little village

I keep playing with different designs of wallets. They are the perfect project to combine with some others, more complicated.
After making some little bugs, like the ladybird and the bee, I have tried a completely different model, these lovely little houses.

So far I have made two of them but I can assure you that I will create some more, many more, I love them!
So I may end up building a whole village :)

It was also a lot fun to take the photos. My daughter helped me to arrange the Playmobil figures around the houses. It was great!


The house is made from different cotton fabrics to create the door, windows and roof. The zipper is in the back of the house and the wallet is fully lined with a black on white fabric.


Sigo probando diferentes modelos de monederos. Son los proyectos perfectos para combinar con otros más complicados.
Después de hacer unos cuantos bichos, como la mariquita y la abeja, he intentado un diseño totalmente diferente, estas casitas tan chulas.

Ya llevo dos pero seguiré haciendo más, muuuchas más, me encantan! Así que quizá acabe teniendo una ciudad completa :)


También me lo he pasado genial haciendo las fotos. Mi hija me ha ayudado a colocar todos los Playmobil alrededor de las casas y crear la escena. Ha sido divertidísimo!


Las casitas están confeccionadas con diferentes telas, una lisa para la parte principal y otras estampadas para crear la puerta, ventanas y tejado.
La cremallera está en la parte trasera y el monedero está totalmente forrado con una tela de letras negras sobre fondo blanco.

20 July 2011

Bzzzzzz.......

Another bug has arrived to our home. Now the nice ladybird has a new friend, a funny bee to play with.


I've used the same pattern but changed the design of the body. For this last animal I have selected a black cotton fabric and stitched a few yellow stripes on top. The result is this vibrant and bright bee.


For the lining I chose a honeycomb pattern, very much in line with the little bee.

My kids liked it a lot. As last time they also had some comments and suggestions, like the idea of adding small wings to the sides to make it closer to a real bee. That might be a next version but I do not want to complicate the design too much. I like it simple and minimal. So, let's see...


Otro bichito acaba de aterrizar en nuestra casa. Ahora nuestra pequeña mariquita tiene un nuevo amigo, una simpática abeja con la que jugar.

He usado el mismo patrón pero adaptado el diseño del cuerpo. Para este último bicho he seleccionado una tela de algodón en color negro, sobre la que he aplicado unas rayas amarillas. El resultado es esta abeja tan alegre.

Para el forro he elegido un estampado en forma de panal, que me ha parecido ideal para completar el conjunto.


A mis hijos les ha encantado. Esta vez también tenían algunos comentarios y sugerencias, como la idea de añadir unas pequeñas alitas a cada lado, de manera que sea una abeja más real. Quizá para una siguiente versión aunque tampoco quiero complicar mucho el diseño. Me gusta simple y minimalista. Así que ya veremos...

18 July 2011

Homemade pizza

We are having a very strange summer. Even though we cannot complain about the weather it is not as stable as it usually is at this time of the year. There are continuos up and downs in the temperature and I would say that it is not as hot as a typical July in Madrid.

Anyway, as I said, we cannot complain at all and I am taking advantage of those not so hot days to use the oven :), which is normally "close for vacation" during summer.

I had not prepared pizza at home for a long time, too long time considering how much we like it. So it was time for it!

I prepared two different types, one with tuna, red pepper and black olives. And the second one with jam, bacon and pineapple. Of course, both with a big portion of mozzarella cheese and homemade tomato sauce, yummy!


This is the recipe for the pizza dough. Then, you can add your favorite ingredients.

Ingredients (for two pizzas):
- 350 gr strong wheat flour
- 250 ml water
- 30 gr fresh yeast
- 4 tablespoons of olive oil
- salt
- a pinch of sugar

Preparation:
Dissolve the yeast in the warm water. Mix it with the rest of the ingredients. I use my KitchenAid, which is really useful for this kind of task. Leave it rest for one hour.

Knead a bit with your hands to remove the air. Divide the dough in two portions and form the pizzas. Leave them rest again for a while (20 minutes will be enough).

Put your selected ingredients on top and bake for a few minutes. That will very much depend on the oven. Mine just need 5-10 minutes.

Once ready sprinkle with oregano and enjoy!!!


Diría que estamos teniendo un verano un tanto rarito. Aunque no nos podemos quejar del tiempo no es tan estable como suele serlo en esta época del año, ya que el termómetro oscila arriba y abajo permanentemente. Con deciros que tengo siempre una chaqueta a mano ya os lo digo todo. Aunque yo tampoco soy una referencia muy fiable en eso... ;)

De todos modos,  como comentaba, no nos podemos quejar en absoluto y, por otro lado, estoy aprovechando esos días más frescos para usar el horno, que normalmente está "cerrado por vacaciones" durante el verano.

Llevaba ya una temporada larga sin preparar pizza en casa, demasiado larga para lo que nos gusta. Así que ya tocaba!

El otro día me lancé y preparé dos diferentes, una con atún, pimiento rojo y aceitunas negras. Y la segunda con jamón cocido, bacon y piña. Por supuesto, que no falte, una buena ración de mozzarella y salsa de tomate casera.

Esta es la receta para la masa. Luego cada uno puede ponerle los ingredientes que más le gusten.

Ingredientes (para dos pizzas):
- 350 gr harina de fuerza
- 250 ml agua
- 30 gr levadura fresca de panadería
- 4 cucharadas AOVE
- sal
- una pizca de azúcar

Preparación:
Disolver la levadura en el agua, previamente templada (yo la pongo 30 segundos en el micro). Mezclar con el resto de ingredientes y amasar hasta conseguir una masa homogénea. Yo uso mi KitchenAid, que es realmente útil para estos trabajos. Dejar reposar durante una hora más o menos. 

Volver a amasar ligeramente, con las manos, para quitar el aire. Dividir la masa en dos y formar las dos pizzas. Dejar reposar unos minutos más, 20 serán suficientes.

Repartir los ingredientes por encima y al horno durante unos minutos. El tiempo, como siempre, dependerá del horno. En el mío con 5-10 minutos es suficiente, pero cada horno es un mundo.

Una vez fuera del horno espolvorear con orégano y a comer!!!

16 July 2011

One more reversible bag

It is ready now! The second denim reversible bag is finished, following this other, the Aqua drops bag.


This time it combines the dark blue denim with a beautiful Amy Butler fabric in lime green background. So it was calling for a binding in the same color range.

I also added the final touch with a sashiko embroidered detail in the front.

The result is a nice shoulder bag in bright and refreshing colors on one side, ideal for summer. And a darker color in the other. I very much like the possibility of using the same bag in different styles so that you can combine it with anything. That way you'll never get bored of it.


Pues ya está listo! El segundo bolso vaquero reversible está terminado, siguiendo la misma línea del bolso Aqua drops. En este caso he combinado tela vaquera por un lado y una tela estampada preciosa de Amy Butler en tonos verde lima por el otro. Con este color principal de fondo pedía a gritos un bies a juego, en la misma paleta de color.

Como me gustó mucho el toque que le daba el detalle de sashiko al otro bolso en éste también lo he añadido. Esta vez he cambiado un poco el diseño y le he dado forma circular.


El resultado final es un bolso de colores alegres y refrescantes por un lado, ideal para verano. Y más oscuro y sufrido por el otro. Me gusta eso de tener la posibilidad de variar estampados y estilos en un mismo bolso. Así no te cansas de él tan fácilmente.

14 July 2011

Patchwork Fusion

Patchwork Fusion is the name of the last bag I have created. I really enjoyed working on this bag. I used black denim and chose bright colors, combining different tones of red, purple and fuchsia for the front. This is not an usual combination but I like how it turned out.


To add a special touch I added a little piece of print fabric in the same color palette, both in the front of the bag and the strap.
The lining features a dots pattern.

Now I want to make more of these....


Patchwork Fusion es el nombre que le he puesto al último bolso que he hecho. He disfrutado mucho haciendo este bolso. Creo que ya lo he dicho más veces, me encanta escoger las telas, probar, mirar, decidir cuáles uso. Y aunque lleva bastante tiempo el esfuerzo merece la pena.

Para este bolso he usado una tela vaquera negra, que he combinado con una selección de telas lisas en diferentes tonos de rojo, morado y fucsia. Aunque no es una combinación muy usual me gusta mucho como ha quedado.


Y para darle un toque especial he incluído un trozo pequeño de tela estampada, tanto en el frontal como en el asa. Es un motivo geométrico en los mismos tonos que el resto.
Para el forro, una tela de lunares.

En las fotos no se aprecia muy bien, pero la parte trasera lleva unas puntadas decorativas.

Ahora me apetece hacer más de estos bolsos...

11 July 2011

Bichos

This is the first little animal from the "Bichos" collection, because more will come in a near future, for sure. It was lot of fun to create it and I am really happy with the final result.
It is based on a pattern from Keyka Lou, where I have added my personal touch.

My kids love it also, even though the first comment they made was to let me know that ladybirds do not have tail... ; ) Anyway, they want one for themselves so, all in all, they accepted it as it is, with a tiny tail.
Furthermore, this tail is really useful and I also think that it adds something special to this little creature.


This adorable ladybird is made from red cotton fabric, with black circles stitched on top. The head is stuffed with wadding to add some volume.
For the interior I selected a colorful print and, of course, I attached the little ghost label in one side.

You can already find this funny purse in the shop.


Os presento al primer animalito de la colección Bichos, porque habrá más que le sigan, seguro! Me lo he pasado genial haciéndolo y estoy muy contenta con el resultado.
Está basado en un patrón de Keyka Lou, al que he añadido mis toques personales.

A mis hijos les ha encantado, a pesar de que lo primero que han comentado es que las mariquitas no tienen cola... ; ) En cualquier caso, me han pedido una para cada uno de ellos, lo que significa que aceptan a esta mariquita tal como es, con su pequeña colita.
Además, aunque es cierto que las mariquitas no tienen cola resulta realmente útil y yo creo que también le añade algo de gracia al bichillo.


Para el exterior he usado una tela de algodón en color rojo sobre la que he aplicado los topos negros. La cabeza va rellena con un poco de guata para darle algo de volumen.
Para el forro he elegido un estampado muy colorido, en topos multicolores. Y, como no podía faltar, le he añadido el logo del fantasmita en un lateral.


Este primer bicho ya está disponible en la tienda.

9 July 2011

Little things

Inspired by this other key ring I tried a different version, also using some fabric scraps. In this case I chose the same fabric as the one I used for the purse organizer. As the fabric features big circles I followed that pattern for the design. I cut two circles of grey felt, added a strap of cotton cord in the middle and attached two circles of the fabric using free stitching.


And voilà! a nice and different key ring.


Inspirada en este otro llavero he hecho una nueva versión, también usando trozos de tela. En este caso he elegido la misma que usé para el organizador de bolso. Como el estampado es de círculos grandes he basado el diseño en ese patrón. He cortado un par de círculos de fieltro gris, he añadido un cordón de algodón entre medias, y para terminar he cosido los círculos de tela con puntada libre.

Y voilà! un bonito y original llavero.


8 July 2011

Maki sushi

If I remember well I have prepared sushi no more than two or three times in my life. I think I had not done it during the last eight years or so. The other day, my kids were asking about sushi. I guess they've seen it somewhere or heard about it. So they were eager to try it and, thus, I thought it was a good opportunity to repeat this recipe.

I must admit that this is a false sushi, as I did not use raw fish but smoked salmon instead. I know, I know, this is not real sushi but if I wanted the kids to try it that was the only option.

Either way, the sushi was not very successful. The kids had just one piece and decided that it was not their cup of tea and prefer to eat the remaining plain rice... So my husband and I had a BIG portion of sushi for dinner. I did not count how many pieces.... a LOT! To me it was delicious.

The way I prepare it is really simple:

1.- Cook the rice and mix with some rice vinegar, salt and sugar, to taste.
2.- Prepare the rolls with nori seaweed, rice and the ingredients you prefer.
3.- Cut in small pieces and serve with soja sauce.

I made three different ones:
- Smoked salmon and avocado
- Omelet, carrot and avocado
- King crab sticks and avocado

Some years ago it was quite difficult to find all the ingredients. Nowadays you can find them in any shopping mall. So there are no excuses at all!


Si no recuerdo mal he debido preparar sushi en casa dos o tres veces en toda mi vida. La última vez debió ser hace ya ocho años, si no más. Hace unos días los niños estaban preguntando sobre el sushi, qué era, cómo se hacía... Imagino que lo debieron ver en la tele o algún sitio. Como estaban tan interesados y les apetecía probarlo me animé y lo hice para la cena.

Tengo que reconocer que no es sushi de verdad, pues no he usado pescado crudo sino salmón ahumado. Los más puristas me dirán que eso de sushi no tiene nada pero, qué le vamos a hacer, era la única forma de que los niños se decidiesen a probarlo.

En cualquier caso no tuvo éxito con ellos. Probaron un trozo y enseguida decidieron que no les gustaba, que "eso" sabía muy raro, y que preferían los restos del arroz, simple y llano. Y eso que la salsa de soja ni la olieron... Así que mi marido y yo nos pusimos morados de sushi. No llevé la cuenta de cuántos trozos nos comimos, pero MUCHOS! En mi opinión estaba estupendo.

La forma de prepararlo es muy sencilla:

1.- Hay que cocer el arroz y mezclarlo con unas cucharadas de vinagre de arroz, sal y azúcar. Las cantidades al gusto de cada uno.
2.- Y después preparar los rollitos con las algas nori, el arroz y los ingredientes que quieras.
3.- Cortar en porciones y servir con salsa de soja.

Yo preparé tres diferentes:
- salmón ahumado y aguacate
- tortilla francesa, zanahoria y aguacate
- palitos de cangrejo y aguacate

Hace unos años era complicado encontrar los ingredientes, como las algas o el vinagre de arroz. Ahora los encuentras en cualquier hipermercado. Así que no hay excusa!

6 July 2011

Con bigotes y a lo loco

My daughter is quite interested about my blogging activity. She is really impressed with the whole process, I am writing in the blog, visiting other people's blogs, posting comments... She likes it, even though she also complains about my habit of taking photos all the time, or most of the time. This is specially critical when it comes to food related pictures. In those cases, the whole family complains ;-)

Coming back to her interest on the blogging world, many times, she is looking at my computer while I am surfing in the web. And she is getting ideas on her own. The other day she surprised me with this moustache. I remember we saw something similar in one blog or web page. Sorry, I do not remember where, otherwise I would mention the owner of this idea.

The fact is that she was inspired by the idea and put it into practice. I love it!


Based on this, I suggested to prepare some more and decorate some straws. I drew the moustaches and she did the rest. And here they are, funny and different straws to be used this summer with cool drinks.


Mi hija está bastante interesada en mi actividad bloguera. Le impresiona el conjunto en sí, el hecho de escribir las entradas en el blog, visitar otros blogs, poner comentarios... Le gusta mucho aunque también se queja a veces sobre mi costumbre de ir haciendo fotos de todo, o casi todo. Especialmente cuando se trata de fotos de comida. En este caso se queja la familia al completo ;-) . Soy la mamá plasta de la cámara de fotos...

Volviendo a su interés por los blogs, muchas veces pulula a mi alrededor cuando estoy en el ordenador, navegando por la red. Y lo curioso es que va cogiendo ideas. El otro día me sorprendió con este bigotillo que hizo ella misma. Recuerdo que vimos algo similar en algún blog o web. No recuerdo donde, lo siento, si no mencionaría al dueño de la idea original. Si en algún momento lo recuerdo o lo vuelvo a encontrar os lo enseñaré.


El caso es que, inspirada por esa idea, se puso manos a la obra y lo hizo en un momento. Me encanta!

Basándome en esta idea, le sugerí después preparar algunos bigotes más, en diferentes formas, y decorar unas pajitas. Yo hice los dibujos y ella el resto. Y aquí están, unas simpáticas y divertidas pajitas, que usaremos este verano con los refrescos.

4 July 2011

Marabara is featured in Atelier magazine

I could not wait to post about it... In the last issue of Atelier magazine there is an article about Artesanio. And guess what? Two of my bags are there! and a short mention of my shop. I went over the moon when I saw it. What a nice surprice!

Here I leave you the link to this magazine so you can take a look.

Revista Atelier no.9


No podía esperar más para publicar esta entrada, que no tenía prevista... En el último número de la revista Atelier hay un artículo sobre Artesanio. Y adivinad qué? Pues dos de mis bolsos aparecen en el artículo! y una mención sobre mi tienda. Me he puesto como loca de contenta cuando lo he visto. Vaya sorpresón!


Os dejo el link a la revista por si queréis echarle un vistazo.


Revista Atelier no.9

Ocean Breeze

Whether you live close or far away from the sea, summer is always associated to the beach, sea, ocean breeze... and this is what this clutch reminds me of. Aqua and turquoise colors, a waves print to cool down the summer hot days.

This is the last clutch I've been working on. I have some other projects in parallel, which I hope to show you soon. Besides, somebody is waiting for one of them...
Coming back to this bag... it can be used as a wristlet or inside your bag, for that extra organization always needed when wearing big bags.


I warned you already about my tendency to select turquoise and aqua colors. You see, I did it again!
Look at my nails... ;-)


Tanto si vives cerca o lejos del mar, el verano siempre se asocia a la playa, el mar, el océano y la brisa marina... y es todo eso lo que me recuerda este bolso. Será por los colores agua y turquesa, y por el estampado en forma de ondas, ideales para refrescar los días calurosos del verano.


Este es el último bolso de mano en el que he estado trabajando. Tengo otras cosas en marcha que espero poder enseñar pronto. Además de que hay alguien esperando para alguna de ellas...
Sobre este bolso... puede usarse como cartera de mano, gracias a la pulsera, o también es muy útil para esa organización extra que siempre hace falta cuando llevas bolsos grandes.


Ya os avisé de mi tendencia a escoger colores turquesa y agua. Otra vez he caído!
Os habéis fijado en el color de mis uñas? ;-)
Pin It
Related Posts Plugin for WordPress, Blogger...