30 June 2012

Travel time


Tonos turquesa, agua, lila, mostaza... una combinación que me gusta mucho.

Así son los últimos joyeros de viaje en los que he estado trabajando. Unos joyeros que piden a gritos irse de vacaciones en alguna maleta.


Turquoise, aqua, lilac, mustard... a color palette which I do love.


These are the new travel jewelry rolls I've been working on. And they are really looking forward to join you in your next trip.

Pin It

28 June 2012

One is not enough

Hay veces que es imposible conformarse con solamente una unidad. Me pasa con los bombones, los Daim (esas chocolatinas suecas con corazón de caramelo duro, mmmm....), las gominolas... Y también me pasa con los monederos. Porque cuando empiezo a seleccionar telas no puedo resistirme a coger varias combinaciones. Una, dos, tres, cuatro... es difícil parar.


In some occasions it is impossible to be content with just one piece. It happens to me with chocolates, Daims (those swedish chocolates with caramel inside, mmmm...), gummies... And also when making wallets. Simply because I cannot stop selecting different fabric combinations. One, two, three, four... it is so difficult to stop.


Pin It

24 June 2012

Marabara & Hopper


Por fin he tenido tiempo de darme una vuelta por el museo Thyssen y ver mis cositas.
En los alrededores, carteles anunciando la exposición de Hopper, que estará abierta hasta mediados de Septiembre. A pesar del calor, da gusto pasearse por esta parte de Madrid un Sábado por la tarde. Apenas había tráfico y no demasiada gente.

Finally I had time to visit the Thyssen Museum and see my designs in the shop.
Around the place, a lot of posters advertising the Hopper exhibition, which will be open till mid of September.
Despite of the warm temperatures it is very nice to walk around this part of Madrid on a Saturday afternoon. Traffic is almost non existing and it is not so crowded.


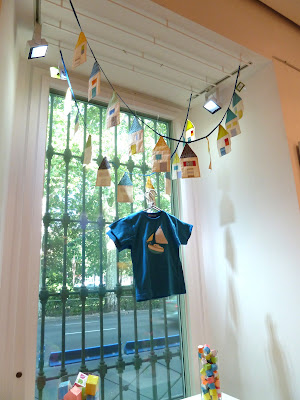
Y allí, en la tienda del museo, están mis diseños, luciendo tan bonitos en el escaparate y en algún que otro rincón.

Móviles, cojines, monederos, bolsos y, la novedad, banderolas de casitas, que quedan preciosas.


And there they are, my designs, looking so pretty in the shop window and some other corners.

Mobiles, cushions, wallets, handbags and, something new, the little houses garlands, which look great.


Pin It

19 June 2012

Marabara's atelier: my treasure

Hoy no voy a escribir mucho, le dejo el protagonismo a mi colección de telas, sin duda, mi tesoro :). Ocupan todo un armario, ordenadas por colores, para que resulte más fácil encontrar la tela que necesito. Aparte, las lonetas, linos, telas vaqueras y otras telas especiales las tengo almacenadas en la estantería de al lado. Creo que ya no me caben más...


I will not write a long post today, I prefer to just show you the pictures of my fabric stash, my treasure! The cotton fabrics are stored in a cupboard, distributed per color range so that it is easier to find the one I need. Apart from that, the special fabrics, such as linen, canvas, denim... are stored in another cupboard. I think I have no more space left...


Pin It

15 June 2012

DIY: Cardboard boxes


Siempre he pensado que la presentación de un regalo, un pedido, cualquier cosa que das a alguien tiene mucha importancia y merece toda la atención. Por muy bonito que sea el contenido, si el envoltorio es una birria, va a influir negativamente en la percepción final. Al menos en un primer momento. ¿No os parece?

Así que hay que ponerse manos a la obra para conseguir un empaquetado de lujo, que es más sencillo de lo que nos pensamos. La idea que os dejo hoy es presentar la pieza en una cajita de cartón y tapa de celofán, que incluso podemos hacer nosotros mismos.
De la misma manera que se puede sacar un patrón de una falda que nos gusta también podemos sacarlo de una caja que tengamos por casa. Así la podremos clonar tantas veces como queramos y en colores y texturas diferentes.
Como soy un poco Diógenes, suelo ir guardando las cajitas y envoltorios que me gustan o creo que puedan llegar a servirme para algo. Si no recuerdo mal, esta cajita es de un pack de calcetines, y me ha venido de perlas para sacar el envoltorio de los packs regalo mini monederos + llavero. Tiene el tamaño ideal.

Más sencillo imposible. No hay más que desarmar la cajita, y marcar el contorno sobre una cartulina. Después recortamos y doblamos para armarla. ¡Y ya tenemos nuestra cajita lista!
El truco para que quede perfecta es marcar las dobleces antes, yo uso una regla pequeña, que paso sobre las líneas que tengamos que doblar. Así conseguimos unas dobleces limpias y un acabado impecable.


Para completar el envoltorio he usado un poco de papel de seda, que adorna y a la vez protege a la pieza de golpes, y lo he cerrado con celofán. Para ello he usado una bolsa de celofán, bien encajada y pegadita con un poco de celo. Una cinta bonita, una pegatina con el logo y no hace falta más!


I do think that the packaging of any present or order is as important as the content itself. It does not matter how nice the product is, if the packaging is horrible the overall impression will be affected. At least at the very first moment, don't you think so?

Thus, we need to invest some time on creating a nice packaging for our products, which is simpler than we sometimes think. Today I bring you an example, a cardboard box with plastic cover, which we can make ourselves.

In the same way we can extract a pattern out of a skirt we like, we can do the same with a cardboard box. That way we will be able to make as many as we need, in different colors and materials.
I tend to keep the packaging that I like or think it might be useful in the future. If I remember correctly, this little box was a socks packaging and it has the perfect size for my mini wallets and key fobs packs.

It couldn't be easier. You just need to "open" the box and transfer the silhouette into a cardboard. Then, cut and mount the box, that's it. The tip to get sharp edges is to mark the folding lines in advance. I use a small ruler to do so. With this trick you will get clean and sharp edges and a very good result.


Pin It

7 June 2012

Marabara's atelier

Hace ya unos cuantos meses os enseñé mi recién estrenado taller. Pequeñito, humilde, pero muy apañado, donde trabajo la mar de a gusto. En su día os mostré el antes, un cuarto que no usábamos, con poca luz y que se había convertido en un trastero. Y también os mostré el después de la pequeña reforma, que consistió en abrir un hueco en una de las paredes para instalar una puerta de cristal, que dejase entrar más luz.


Pues vuelvo a dar la lata con el taller y os voy a ir enseñando sus rincones poco a poco. A mi, que soy cotilla por naturaleza (lo confieso), me encanta ver los talleres de otros diseñadores y artesanos, coger ideas de organización, decoración y demás. He pensado que quizá os pueda servir de inspiración, o simplemente os entretenga ver cómo tengo todo organizado.

Así que allá voy, con la primera entrega de la serie.

Una de las cosas que más me gustan de mi taller es la cantidad de espacio de almacenamiento que tiene. Conseguido gracias a mobiliario de Ikea (creo que ya os he dicho que me gusta mucho, así que no insisto más). Una de las paredes está totalmente cubierta por estructuras de almacenaje, por un lado un armario para las telas y por otro una estantería con cajones y puertas, donde guardo herramientas, materiales... Aquí es donde guardo los hilos. Tengo una colección considerable y estos cajones tienen el tamaño ideal para las bobinas. Un par de cajones para las grandes y otro más para las más pequeñas. En el de al lado las agujas, imperdibles y clips para patchwork, las herramientas para hacer biés... Al cabo del tiempo acabas acumulando tantas cosas que unos cuantos cajones no vienen mal para tenerlo todo en orden.


Esta estantería está justo a la espalda de la máquina de coser, con lo que la tengo muy a mano para ir cogiendo los hilos que necesito, cambiar agujas... no tengo más que girarme.


A la estantería inicial le he ido añadiendo más puertas, para así proteger del polvo el contenido. En la próxima entrega os enseñaré dónde guardo las telas.

Some months ago I posted some photos of my atelier. A little one, but very comfortable and with everything I need. I showed you the before and the after. A room, not used at all, with not so much natural light, totally transformed by adding a glass door in one of the walls.


Well, I am now coming back again to talk about it. I will be showing you, step by step, the different corners of my lovely working space. I like to see the working areas of other designers and crafters (I am curious, I need to admit it) as I can get ideas about organization, decoration, etc... So I thought it could be interesting to show mine so that you might get some inspiration or just know a little bit more about the place I am working in.


So, here we go, with the first one of this series.


One of the things I really love from my atelier is the enormous amount of storage space that I got. One of the walls is completely covered with cupboards (Ikea, what else...?). On one hand to keep my fabric stash, and on the other some tools, material, etc... This is where I store the thread. I have a big a collection of spools and these drawers have the perfect size for them. Two drawers for the big spools, one more for the smaller ones.


This cupboard is just located at the back of my sewing machine so it comes in handy when I need to change the thread.


I will show you my fabric stash storage in the next chapter :)

Pin It

1 June 2012

Getting ready

Poquito a poco, pieza a pieza, voy viendo crecer la montaña de cojines, bolsos casita, monederos y demás productos, esperando a ser enviados al Museo Thyssen.

Ya estoy en la recta final. Contenta y satisfecha por haber sido capaz de tener el pedido a tiempo. Uf! ha sido todo un maratón de diseñar, medir, cortar, montar, coser y rematar. Aún me quedan algunas cositas, pero ya está casi todo hecho. Qué gustazo!

La inauguración de la exposición de Hopper, en quien está inspirada esta colección, es el día 12 de junio. Para esa fecha ya estará todo en la tienda del museo, en su escaparate y estanterías. Y allí estaré yo, cámara en mano, para hacer un reportaje fotográfico del evento,  ¡como se merece! Volveré con más :)


Step by step, one product after the other, I can see how the pile of finished cushions, bags, wallets... is growing every minute, waiting to be sent to the Thyssen Museum.


I am already in the countdown, feeling very happy and proud because I managed to be ready. Uf! it's been a lot of work, hundred hours designing, measuring, cutting, mounting, sewing and finalizing all the pieces. There are still a few things left, but it is almost done. And it feels great!!


The Hopper exhibition, which is the inspiration for this collection, will open its doors on June 12th. By then, everything will be at the museum's shop. And I will be there also! I do not want to miss it. It deserves a nice photo session. I'll come back with that very soon :)

Pin It
Pin It
Related Posts Plugin for WordPress, Blogger...