30 June 2011

Patchwork pouch

During the past weeks I've been, mostly, making bags. So, when I got the request to make a patchwork pouch I was more than happy. I was missing this kind of activity, which means measuring, cutting and sewing little pieces of fabric to get something bigger, like this composition. It looks beautiful when you put it in front of a window, isn't it?

What else can I say about the aqua-turquoise color? I love it and have the tendency to choose fabrics in that color range. In the next few days you will see some more...


The request was coming from a friend, who is going on vacation in a couple of days. Therefore, I started working on it right away so I could have it ready before they go. I managed! and hand it over this pouch yesterday morning.

It is a bigger version of my Aqua patchwork pouch. I call it the big brother, although the official name is Maxi Aqua Patchwork. If anybody is interested you can order it through my shop, here.


Durante las últimas semanas no he hecho más que bolsos... y más bolsos. Así que, cuando recibí la petición de hacer un neceser en patchwork, no pude ponerme más contenta. La verdad es que echaba de menos este tipo de trabajo, que implica medir, cortar y coser pequeños trozos de tela hasta obtener una pieza mayor, como la composición de este neceser. Verdad que queda preciosa delante de la ventana? A mí me encanta cómo pasa la luz a través de los diferentes cuadritos.

Y qué decir sobre el turquesa? Tengo cierta tendencia últimamente hacia este color y siempre acabo escogiendo telas en esta paleta de colores. En uno o dos días podréis confirmar que tengo razón.


La petición de este neceser venía de unos amigos que se van de vacaciones en un par de días. Así que motivo doble para ponerme a ello inmediatamente y tenerlo listo antes de que se fuesen. Y lo he conseguido! lo entregué ayer mismo, a tiempo para que lo puedan estrenar en su próximo viaje.


Es la versión grande de mi neceser Aqua patchwork. Yo le llamo el hermano mayor, aunque oficialmente es el Maxi Aqua Patchwork. Si alguien está interesado, está disponible, bajo pedido, en mi tienda, aquí.

29 June 2011

Winter garden

After many, many months and a LOT of work, finally!, our winter garden is ready. Well, I should better say almost ready as there are still some minor things to be done, just minor...

It is an L shape room, with glass walls and glass roof. Therefore, there is a lot of natural light, which makes it ideal for plants. This is where we have moved the citric trees, hoping that they will grow a bit more from now on. So far we had no other choice than moving them inside and out, depending on the season, to avoid freezing. Now they should be happy.


In the same side we have created a relaxing-reading corner, with two armchairs and glass side tables.

In the other side of the L shape we have installed a hammock, the one I mentioned that I have to repair due to some little mice. No photos yet, I will post some as soon as I am ready with it.


Now the only thing missing is to install a canopy in the glass roof to avoid having direct sun and, hence, reduce the heat. For the moment we have a temporary solution, reusing some old blinds. However, we are not so convinced about it. Anyway, this will have to wait for a while. It is not in the priority list right now.


Después de unos cuantos meses, muchos meses, y muuuucho trabajo, por fín!, tenemos nuestro invernadero terminado. Quizá no debería decir terminado, pues aún faltan algunos detalles, pero casi, casi.

Es un espacio en forma de L, acristalado tanto en fachada como en el techo. Entra muchísima luz, con lo que es ideal para plantas. Aquí es donde hemos trasladado nuestros cítricos que espero empiecen a crecer un poco más. Hasta ahora no nos quedaba más remedio que ir cambiándolos de dentro a fuera, y viceversa, para evitar heladas. Ahora que ya tienen sitio fijo deberían estar contentos.


En este mismo lado de la L hemos creado un rincón de relax-descanso-lectura, con un par de sillones y unas mesitas de cristal.

En la parte corta de la L hemos colgado una hamaca, la que comenté el otro día que tengo que reparar a causa de los ratoncitos dichosos. No tengo fotos de momento, pondré algunas en cuanto la tenga lista.


El otro detalle que nos falta es instalar unos toldos en el techo acristalado, para que no entre tanto sol y controlar un poco el calor. Ahora tenemos una solución temporal, en una de las fotos se ve un pelín. Hemos aprovechado unos antiguos estores que ya no usábamos, pero no nos convence demasiado. Aunque de momento se queda así, esta parte tendrá que esperar un poquito más. Para un próximo capítulo....

27 June 2011

Three in a row

I had cut all the pieces for these three bags a long time ago. However, they were hidden between different other fabrics. The other day, when rearranging my corner studio I discovered them and decided that they had to be finished before they could be forgotten once again.


So, here they are, three more curvy clutches for the collection. All of them with strap since I like the way it turns out and how comfortable it is.

White & Black Paisley

They will be available very soon in the shop.

Newspaper


Tenía todas las piezas cortadas para estos bolsos desde hace ya mucho tiempo. Pero habían quedado olvidados entre otros montones de tela. Al ordenar y organizar mi estudio los he rescatado y decidido que tenía que terminarlos antes de volver a abandonarlos durante otros cuantos meses más.


Y, dicho y hecho, aquí están, tres curvy clutches para la colección, todos con asa, pues me ha gustado mucho cómo quedan y lo cómodos que resultan.


Vera's garden


Estarán disponibles en la tienda muy, muy pronto.

26 June 2011

Decorated sticks

When your kids start claiming that they are boring it is good to have some easy activities they can do on their own and keep them busy for some time.

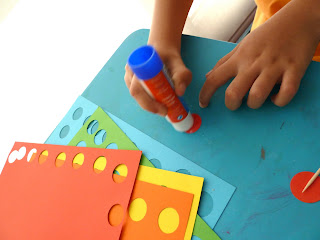
This afternoon my daughter was in the boring mood so I gave her the possibility of making decorated toothpicks to be used when preparing appetizers or desserts.


It is a really simple and funny activity which requires just a few "ingredients". You will only need:


- a craft punch. We used a circle one
- toothpicks
- a glue stick
- assorted color cardboard

The process couldn't be easier. Using the craft punch, make several circles. Glue them together, inserting the toothpick in between and you are ready!


Cuando los niños empiezan a repetir una y otra vez que están aburridos siempre es conveniente tener alguna actividad sencilla, que ellos mismos puedan hacer, y que les mantenga ocupados durante un buen rato.


Esta misma tarde mi hija estaba en modo "aburrido", así que se me ocurrió entretenerla haciendo palillos decorados, que luego usaremos para decorar aperitivos, postres o meriendas.


Es de lo más sencillo y solamente hacen falta unos pocos ingredientes:


- un troquel para papel. Nosotros hemos usado uno circular
- palillos
- cartulinas de colores
- pegamento en barra


Simplemente hay que cortar círculos con el troquel y pegarlos entre sí, con el palillo entre medias. Obtendrás unos divertidos palillos y los niños se entretendrán un buen ratito. Además, te puede servir para animarles a ayudar en la cocina cuando los vayas a usar ;-)

25 June 2011

Pomegranate flowers

The pomegranate trees are now blooming. The flowers are really nice, with a vibrant red color. They look like paper flowers.

Los granados están floreciendo estos días, así que lucen estas flores tan bonitas, en un rojo brillante. Parecen de papel.


23 June 2011

My sewing corner

After organizing and cleaning up my sewing corner it is now in a good shape to be published.

As you might notice it is 100% Ikea. I have used different storage systems and adapt them to my needs. I'll show you...

A shelf with sliding doors, where I keep all the ribbons, inside kitchen glass jars, and some white boxes on top of it, containing the fabric scraps.
In the corner, there is a bin to hold some rolls of fabric and interfacing.


At the back, behind the chair, you can see a book shelf, where I have the threads and all the accessories for my sewing machine, such as presser feet, needles, etc... I am sharing this shelf with my kids, so half of it is full of sewing stuff and the other half with toys :)

My working table is built with two desks. On one side I have the cutting board and all work in progress. On the other side you can find the computer and the sewing machine.

In the front wall I mounted a kitchen rack, with some small containers, where I have the scissors, cutters, pencils and some notes. This is extremely useful as you avoid having too many things on the table.


Finally, I have recently added a glass board, where I keep a list of my custom orders. Right now you can see there the denim bag (already done!), a PC bag, a patchwork pouch...

I still need to find a good way to store my rulers so that they are at hand but safe at the same time. I haven't found the ideal solution yet. I keep searching... sooner or later I'll find it!

And that's it for the moment. I hope you have enjoyed this tour around my studio.


Después de organizar y ordenar mi rincón de costura ya está en buenas condiciones para poder mostrarlo.


Como podréis ver es 100% Ikea. He usado diferentes sistemas de almacenaje, tanto de oficina, como de cocina, que he adaptado a mis necesidades. Os cuento...


En la pared tengo un módulo con puertas correderas, aquí es donde guardo todas las cintas, lazos, etiquetas, dentro de botes de cristal de cocina. Encima he puesto unas cajas de cartón blancas donde tengo los retales que me van sobrando.


Por otro lado, en el rincón, tengo una papelera para almacenar algunos rollos de tela y entretela que, de otra manera, no sabría donde meter.


Detrás de la silla he colocado una estantería, donde tengo los hilos y todos los accesorios de la máquina de coser, como prensatelas, agujas y demás. Esta estantería la comparto con mis hijos, así que la mitad está ocupada por mí, con mis cositas de costura, y la otra por ellos, con sus juguetes. Vaya mezcla... :)


Pasando a la mesa, ésta la he formado con dos escritorios enfrentados. Así, en un lado tengo la tabla de corte y los trabajos que tengo en marcha. Y por el otro el ordenador y la máquina.

En la pared frontal he montado un riel, de los de cocina, con unos pequeños contenedores donde tengo las tijeras, cutters, reglas pequeñas, lápices, notas... Es realmente útil, pues evitas tener un montón de cosas dando vueltas encima de la mesa.


Y para terminar, hace poco he montado una pizarra de cristal donde tengo la lista de los encargos que me van llegando. Ahora mismo tengo el bolso vaquero que os enseñé ayer, hecho!, una bolsa para ordenador, un neceser en patchwork... No me aburro.

Todavía no he encontrado la solución ideal para organizar mis reglas de corte, que ahora tengo encima de la mesa, sobre un contenedor blanco (donde tengo todas las cosas empezadas). Necesito algo donde tenerlas a mano y protegidas al mismo tiempo. Son tan grandes que al más mínimo descuido van al suelo. Yo sigo buscando, seguro que encontraré algo.

Bueno, espero que os haya gustado el tour por mi "estudio".


Nota: donde digo "he montado", en realidad ha sido mi marido que, muy pacientemente, ha montado y colgado todas mis ocurrencias...

22 June 2011

Denim bag

I've been quiet lately when it comes to blogging about bags, pouches or any of my creations. I have been a little bit busy cleaning up my sewing corner, which was getting quite messy. In parallel I have been sewing also, although I have not finished yet most of the things I have started.

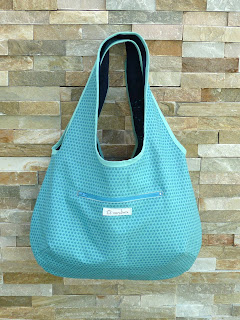
This is the first bag ready to be shown. One of my friends asked me to make a bag in denim and turquoise. And this is my answer to that custom order.
It is a versatile bag, which combines with everything. Besides it is reversible, so you have endless possibilities to combine it with your clothes or... your mood.


I have added some personal touches to avoid getting a boring bag. In the first place I have used a bias tape in aqua, which adds the vibrant point to the denim side. Secondly, I have also added a geometrical design in one of the handles, using the sashiko technique, in the same color range.


I love the result! I love it that much that I am thinking already about the next ones that I will produce, in different colors and prints :)


Hacía ya mucho tiempo que no publicaba nada sobre bolsos, neceseres o alguna de mis creaciones. He dedicado unos días a organizar un poco mi rincón de costura, que empezaba a ser bastante caótico. En paralelo he seguido haciendo cosillas, aunque no he llegado a terminar muchas de ellas todavía.


Este bolso es el primero que ve la luz. Una amiga me encargó hacerle un bolso con tela vaquera y forro en turquesa. Y este es el resultado.
Es un bolso muy neutro, que combina con cualquier cosa. Además, tiene la ventaja de ser reversible, con lo que las posibilidades de combinación se multiplican.


Para darle un toque especial y que no resultase demasiado soso le he puesto un bies en tono turquesa. Así el lado vaquero tiene ese puntito que necesitaba.
Y para no dejarlo solamente ahí le he añadido un detalle en una de las asas. Un diseño geométrico hecho en sashiko, con hilo de bordar también en tono turquesa.


Me gusta mucho! Tanto que ya le estoy dando vueltas a los siguientes que voy a hacer :)

21 June 2011

White Tuesday

I found this wild flower in the garden. I do not know the name or what type of plant is. I liked it and decided to cut it and make this arrangement.


El otro día me encontré con esta flor en el jardín, que ha salido ella solita. No sé que planta es, probablemente una mala hierba, pero me pareció tan bonita que decidí cortarla para ponerla dentro de casa.


19 June 2011

Mardito roedore!!!

... As the cat from Tom & Jerry would say... "damned mice!!!"
We used to have this hammock in the garden, in the previous house. When we moved to our own house we put it in the basement, waiting to find the best place for it.

Well, we have already found the place. It is hanging now in the recently built winter garden. But, oh surprise, when we took it and discovered that some nice mice had been enjoying it during that time. These "damned mice" have been eating bits and pieces of the hammock and there are some holes which need to be repaired.


I am now thinking about the best way to do it.  I guess that the most appropriate thing will be to sew some patches, using a similar fabric. It is black denim, which I have in my fabric stash. So I just need to do it! Another task to be added in my To Do list.

Later on I will make some colorful cushions to embellish the hammock and hide the patches. A quilt is also in my wish list. Maybe a summer project, let's see if I have the time.
Both cushions and quilt will be ideal for the naps we intend to have in there... :)


... como el gato de Tom & Jerry diría... "Mardito roedore!!!"
Teníamos esta hamaca en el jardín de la antigua casa. Cuando nos mudamos a la actual lo guardamos en el garaje, a la espera de encontrar el sitio más adecuado para ella.


Pues bien, ya tenemos el sitio ideal. La hamaca está ahora colgada en el invernadero que acabamos de terminar. Pero, sorpresa, sorpresa! cuando sacamos la hamaca del garaje y vimos que unos lindos ratoncitos habían estado disfrutando ya de ella.  Estos "mardito roedore" se han comido unos trozos de la tela y ahora tenemos unos cuantos agujeros repartidos por la hamaca.


Así que que ahora estoy pensando en la mejor forma de repararla. Supongo que lo mejor será parchear los agujeros con una tela similar. Es tela vaquera negra, que tengo en mi "almacén" de telas, con lo que solamente tengo que cortar los trozos y coserlos de manera que no se note mucho.


Más tarde, tengo pensado hacer unos cojines de colores para adornar un poco y que no se vean tanto los parches. Ya enseñaré el resultado. También tengo en mente hacer una manta de patchwork, que seguramente queda muy bien y resulta muy cómoda para las siestas que tenemos pensado hacer en la hamaca.... :)
Pero esto será un proyecto para el verano, si es que tengo tiempo.

18 June 2011

Chill out corner

Finally, one year after the terrace was renovated, we have managed to arrange again our chill out corner. A comfortable sofa and a good drink are the perfect combination for a nice evening al fresco.

This corner was open before in two sides, now there is a glass closing the rear part, plus a couple of curtains to filter the light. That way we avoid the uncomfortable wind we always had in that area.


I still need to hem the curtains, which I hate, by the way. It is in my To Do list for next week. Anyway, we can already enjoy this corner again, which make us feel that we have accomplished one of the goals for this summer. Yay!!!


Por fin, un año después de haber reparado la terraza, hemos conseguido terminar y volver a componer nuestro rincón chill out. Un sofá cómodo y una buena bebida, ya sea el aperitivo, té/café de la tarde o un cóctel por la noche, son la combinación perfecta.


Este porche estaba abierto anteriormente por dos de sus lados. Y siempre teníamos un viento entrando desde el costado que resultaba algo molesto. Aprovechando la reforma (como un montón de cosas más  en esta casa), hemos cerrado el lado norte con un cristal, que nos quita ese permanente viento. También hemos instalado unas cortinas muy finas, suficiente para tamizar un poco la luz y hacerlo más agradable.


Todavía me queda coger al bajo a las cortinas, algo que odio, por cierto. Lo tengo en mi lista de tareas para la próxima semana. En cualquier caso, podemos decir que hemos cubierto uno de los objetivos de este verano. Bravo!!!

17 June 2011

Treats bags

Today we have celebrated our daughter's birthday, with some delay since it was a couple of weeks ago.
She spent the afternoon with her best friends, playing in the garden, swimming and..... crafting.

This morning I had a last minute idea. I thought it would be nice to give them a personalized bag. So, right after breakfast I started working on it. I made small fabric bags, using natural cotton and a red satin ribbon to close them.

Then, during the afternoon snack I gave them the bags and fabric markers. Their imagination did the rest. They had a lot of fun and enjoyed decorating their own bags, which were filled afterwards with some treats, like bubble bottles, a few sweets and some other small gifts.

It was really nice to see their faces and how happy they were with their bags. They made a great job!


Hoy hemos celebrado el cumpleaños de nuestra hija, con un poco de retraso porque fue ya hace un par de semanas. Pero más vale tarde que nunca!
Sus mejores  amigas han venido a pasar la tarde con ella y lo han pasado en grande jugando en el jardín, columpiándose, bañándose.... y haciendo manualidades.

Esta mañana, de repente, se me ha ocurrido una idea para el cumple. He pensado que estaría bien darles una bolsita personalizada a cada una de las niñas. Así que, nada más desayunar, me he puesto manos a la obra y he hecho estas bolsas de tela. He usado un algodón natural y una cinta de raso en color rojo para el cierre, en fruncido.

Esta tarde, durante la merienda, les he dado las bolsas y unos rotuladores especiales para tela. Su imaginación y sus manos han hecho el resto. Se lo han pasado muy bien y han disfrutado mucho decorando sus propias bolsas, que hemos llenado después con unos regalitos, como pomperos, algunos caramelos y otras cosas pequeñas.

Me ha encantado ver lo contentas que estaban con sus bolsas terminadas. Han hecho unos dibujos preciosos!


Pin It
Related Posts Plugin for WordPress, Blogger...